
(Be sure to upload your photos from trying this project into the Brassy Apple Projects Flickr group!)
I'm not sure if anything is faster than this quick DIY project. If you want to add a some color or something unique to your home decor try this!
1. Pop some fabric that you love behind a frame and you are done!
2. Group several frames together, each with a different fabric, for a more dramatic display.
3. AND these are sooo quick and easy to make a quick change when the seasons change, holiday time, etc.
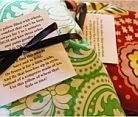
Many of you have seen photos of my entryway. Don't stop at just frames! There are several options of "objects" to place fabric behind besides just picture frames - how about windows?


Here's some ideas for picture frames too! They can go anywhere in your house including the bathroom like these:


You should always surround yourself with things that you love. These are great ways to pops of color, design and pattern anywhere in your house. Now if you want to get a bit more crafty, break out the supplies and lets get started!
Framed silhouettes -
Supplies needed:
Fabrics - or patterned scrapbooking papers
fusible fleece or interfacing (optional)
iron
picture frame
fabric marker
silhouette pattern
fun things to embellish with - ribbons, etc
Step 1: Pick your fabrics. (or papers. in this project I will be referring to fabrics) You will need one for the background and one for the silhouette.
Step 2: Apply the interfacing or fusible fleece to the back of your silhouette fabric per manufacturers instructions. This step is optional but if you want to add dimension to your silhouette use the fusible fleece. If you want to keep the edges neat, crisp, clean and free from fraying without any dimension use the interfacing.

Step 3: Using your Fabric Marker, trace your silhouette on the back side of your fused fabric and backwards too. This will ensure when you flip it over it's not facing the wrong way in the case of an alphabet letter, etc. ** Your Silhouette can be of ANYTHING - an initial letter, your child, favorite animal, favorite shape. Look to magazines, books, die cut shapes, stencils, etc to help you find a pattern.

Step 4: Cut out your silhouette and place it on your background fabric. Place the glass from the picture frame on top of your design and trace around it with a fabric marker. Set the glass aside and cut out the background fabric.

Step 5: Your design might look complete now but if it doesn't and you feel it still needs alittle something - now's the time to embellish! I used black ribbon to set it off from the frame. I simply cut 4 lengths and placed them in the pattern I liked. I used a bit of a glue stick to keep the pieces in place too. You don't have to use a lot. It's just a quick easy technique to keep it together before you place it in the frame.

Step 6: Cut any ribbon, fabrics or other embellishments that are hanging over the edges and place it in your frame. Polish the glass and display!


8 comments:
Love it Megan!
I absolutely LOVE these ideas! This gave me some new ideas for when I redecorate Sugar & Spice's room. :o)
THANK YOU Megan! I recently re-did my kitchen with Amy Butler fabrics and have a wall that was in 'need' of something spectactular, but I couldn't figure out exactly what it needed or what I wanted. You have inspired me so! I have just the frame too! You & everything you come up with are just awesome. Keep up the fantastic inspiration :o) Deanna
ohhh!!! I cant wait to try this megan! I have scrapbooking paper framed ALL over my house already, but now I want to try adding the 3D element! Thank so much for sharing these ideas!!
wonderful! I'm glad you ladies felt inspired! :) Be sure to come back and show us what you have created! We'd love to check it out on your blog! :)
great ideas!!! Gotta try them out!
This is such a great idea! I have framed antique (actually antique looking and not really antique!) fabric in sqaure and rectangular frames and put them up on my living room wall...looks awesome! :-)
P.S: Stumbled to your blog from somewhere today...loved going through your posts :)
I love the idea of using the window as a coat rack. I have an old window that I haven't been able to get rid of, but haven't found a good use for it yet.....until today! Thank you! :)
Post a Comment